Webhooks for Lead Capture Forms: Send Leads to Any Tool Instantly
When someone submits a lead capture form on your website, their information doesn’t just sit there waiting to be processed. In most modern setups, that data immediately moves to other tools your team uses - like a CRM, an email platform, or an internal notification system.
Webhooks make this process automatic. The moment a form is submitted, the form sends the lead data directly to another application. There is no exporting, no manual copying, and no waiting for scheduled syncs.
This is what allows lead capture systems to react instantly. A new submission can create a contact in your CRM, notify your sales team, trigger an email sequence, or start a larger automation workflow within seconds.
What Is a Webhook in a Lead Capture Form?
Identified formatting instruction and applied emphasis
A webhook is an automated HTTP request that your form sends to another application the moment someone submits their information.
Think of it as a tap on the shoulder. Your form says, "Hey, someone just submitted. Here are their details."
The data goes straight to the listening tool. There is no middleman, no delay, and no export. For lead capture, a webhook means a new submission immediately triggers a notification, a CRM entry, a Slack alert, or any other action you've set up — without anyone on your team doing anything manually.
You configure it once. After that, every lead goes exactly where it needs to go.
How Does a Webhook Work When Someone Submits a Form?
The process runs in the background, but the logic is straightforward.
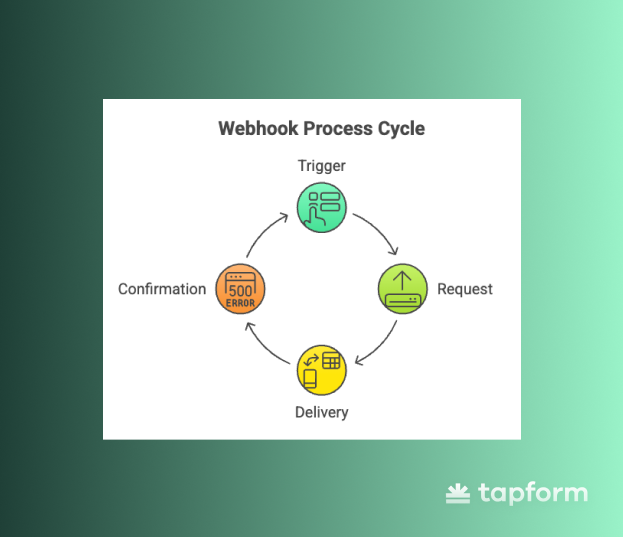
Step 1 — The trigger. A visitor completes your lead-capture form and submits it. That action is the event.
Step 2: The request. Your form builder creates an HTTP POST request with all the submitted data, such as name, email, phone, and any custom fields. It sends this to the URL you have specified. That URL is your webhook endpoint.
Step 3: The delivery. The receiving application gets the request, reads the data, and acts on it. This might be creating a contact in your CRM, adding a row to a spreadsheet, or sending a Slack notification to your team.
Step 4: The confirmation. The receiving server returns an HTTP 200 response to confirm it received the data. The whole exchange takes just a second or two.
The visitor doesn’t see any of this. From their side, they submitted a form. Behind the scenes, their information has just been added to your entire workflow.
Why Webhooks Matter for Lead Generation
Speed is one of the most underrated factors in lead conversion. Research shows that the faster you follow up with a lead, the more likely you are to convert. Waiting even 30 minutes can dramatically lower your chances.
Webhooks make speed possible at scale. Without webhooks, your team has to do manual data entry, rely on scheduled syncs that run every hour, or export CSVs and upload them. Each step adds a delay. Each delay can cost you conversions.
With a webhook, as soon as a lead submits your form, they can be in your CRM, assigned to a sales rep, added to an email sequence, and flagged in Slack. This all happens before your team even sees the notification.
This is not just about efficiency. It gives you an advantage over competitors who still manage lead data by hand.
What Data Gets Sent in a Webhook Payload?
When your form sends a webhook, it includes the submission data as a JSON payload. This is a structured block of information that the receiving application can read and use.
A typical lead capture webhook payload looks something like this:
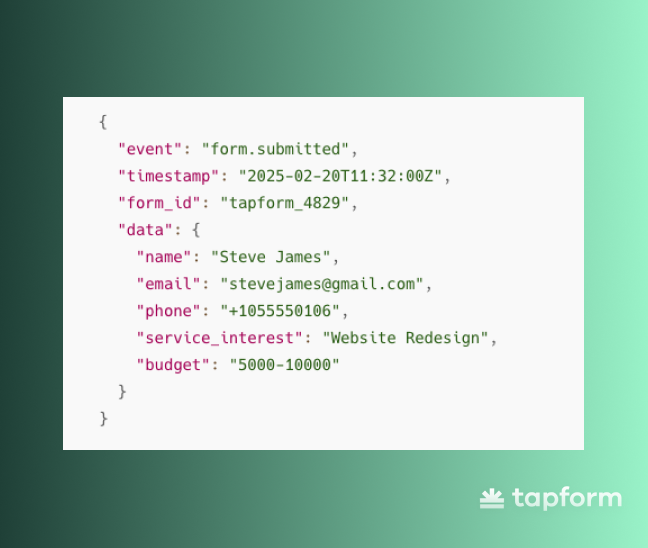
The payload includes the event type, when it occurred, which form triggered it, and all the fields the visitor filled in.
Your receiving application reads that JSON, maps each field to the right place, and takes whatever action you have defined. Most modern tools like CRMs, email platforms, and automation software accept webhooks and know how to use this format.
How to Set Up a Webhook for Your Lead Capture Form
Setting up a webhook doesn’t require a developer. Most form builders, including TapForm, let you configure webhooks directly from the dashboard.
Step 1: Get Your Endpoint URL
The endpoint is the address to which your form sends data. This comes from the receiving application — your CRM, your automation tool, or a custom server you control.
If you’re connecting to a platform like HubSpot, Zapier, or Make, they’ll give you a webhook URL when you create a new workflow or trigger. Copy it — you’ll paste it into your form settings.
Step 2: Add the Webhook to Your Form
In your form builder, find the webhook or integration settings. Paste in the endpoint URL. Some platforms also let you add custom headers. For example, you might add an authentication key that verifies the request is coming from your form and not from somewhere else.
Step 3: Map Your Fields (if needed)
Some receiving applications need to know which JSON field matches which field in their system. If your CRM calls the email field contact_email, but your form sends it as email, you need to map them. Most no-code tools let you do this with a simple dropdown.
Step 4: Send a Test Submission
Before going live, submit a test entry through your form and check whether the data arrived correctly on the other end. Most automation platforms display the raw payload so you can confirm that every field came through as expected.
Step 5: Go Live
Once the test passes, you’re done. Every future submission will fire the webhook automatically.
Where Can Webhooks Send Your Lead Data?
This This is where webhooks are especially powerful. Since you are just sending an HTTP request to a URL, the receiving end can be almost anything.
Platforms - Create a new contact or lead record the moment someone submits a form. Tools like HubSpot, Salesforce, and Pipedrive all accept webhook data, either natively or through integration layers.
Email marketing tools — Add the lead to a nurture sequence, tag them based on their form responses, or trigger a welcome email. Platforms like Mailchimp, ActiveCampaign, and ConvertKit work well here.
Team notifications — Send a formatted message to a Slack channel when a high-value lead comes in. Your sales team gets the alert in real time, not when they check the inbox.
Automation platforms: Route the webhook through Zapier or Make to trigger multi-step workflows. A single form submission can create a CRM contact, start an email sequence, add a row to a Google Sheet, and send a Slack message. All of this can happen from one webhook.
Custom applications — If you have an internal tool or a custom-built system, your developers can build an endpoint that processes the webhook payload and does anything your business logic requires.
The key is that you are not limited to a single destination. One webhook can send data to multiple systems if you route it through an automation platform first.
How to Make Sure Your Webhook Is Working
Webhooks run in the background, so failures can go unnoticed. A few simple practices can help keep things reliable.
Check the response status. A successful webhook delivery returns an HTTP 200 response. If your receiving server returns a 400, 404, or 500, something is wrong. Most form builders log delivery attempts and their response codes so you can spot failures quickly.
Watch for retries. If your endpoint does not respond in time, the sending system may retry the webhook. This is usually helpful, but it means your receiving application could get the same submission twice. Build your workflow to handle duplicates. For example, check whether a contact with that email already exists before creating a new one.
Use a test tool during setup. Webhook.site is a free tool that gives you a temporary endpoint URL and shows every request that arrives, including the full payload and headers. This is the fastest way to check that your webhook is working before you connect your real systems.
Add a Add a signature header. If your form builder supports it, enable webhook signatures. This adds an HMAC-based signature to each request. Your receiving server can verify this key to confirm the data came from your form and not from someone else.re Webhooks Better Than Native Integrations?
Both options have their place. The answer depends on what you are connecting.
Native integrations, where your form builder has a built-in connection to a specific tool, are easier to set up and usually more user-friendly. If TapForm has a direct integration with your CRM, that is often the fastest path.
Webhooks are more flexible. They work with any application that can receive an HTTP request, which is almost everything. They also give you more control over the data. You decide what gets sent, how it is formatted, and what triggers the delivery.
The practical approach for most teams is to use native integrations when they are available, and use webhooks for everything else. Combine them with an automation platform like Make or Zapier, and you can build a lead routing system that works as well as what larger companies spend months building.
What This Looks Like in Practice
Imagine a visitor lands on your service page, fills out a multi-step form, and hits submit at 2:14pm.
By 2:14pm and 3 seconds, a webhook has sent their details to your CRM. A new lead record is created and assigned to a rep. A Slack message goes to your sales channel. An automated email is sent to welcome the lead and set expectations. Your sales rep sees the notification, clicks through to the CRM record, and calls the lead within five minutes.
That entire sequence, from form submission to a real person on the phone, happened automatically. The webhook connected every step.
That's the practical value of getting this right. Not just faster data. A genuinely better experience for leads, and a more responsive, scalable process for your team.